Kubernetes Data Management: Why Velero is the Ideal Partner?

SRE/Kubernetes Admin
Rafael Lenzi

In an increasingly dynamic and complex infrastructure scenario like Kubernetes, data security and resilience are top priorities. Unexpected losses can occur due to hardware failures, human error, or even disasters. It is in this context that Velero, a robust and flexible Open Source tool, stands out as an essential ally for protecting your Kubernetes environment.
What is Velero?
Created in 2017 by Heptio, Velero is a powerful tool built specifically for the challenges of backing up and restoring resources and persistent volumes in Kubernetes clusters. Unlike adapted solutions that try to fit this format, Velero understands the granularity of Kubernetes resources and the complexities of cloud-native environments. Its versatility allows it to run on a variety of platforms, from market-leading cloud providers to on-premises environments.
This translates into significant advantages for your workflow:
Native Integration and Efficiency: Being built for Kubernetes, Velero deeply understands its architecture, ensuring more efficient and reliable backups and restores.
Robust Protection Against Data Loss: Perform consistent backups of your entire cluster or specific resources (deployments, PersistentVolumes, etc.), ensuring the ability to quickly restore your environment in the event of failures, human errors, or disasters.
Simplified Cluster Migrations: Facilitate the movement of your workloads and configurations between different Kubernetes clusters, ideal for version upgrades, cloud provider changes, or infrastructure consolidation.
Seamless Replication for Development and Testing: Create true copies of your production clusters in development and test environments. This ensures consistency, accelerates the software lifecycle, and enables more realistic and secure testing.
The Velero Architecture
Velero Server: A server run as a set of pods inside your Kubernetes cluster. It is responsible for orchestrating backup and restore operations.
Velero CLI: A command line interface that you install locally to interact with the Velero Server, allowing you to run backup, restore, and schedule commands.
For an in-depth understanding and access to the latest documentation, visit this link.
How Velero Works: The Three Fundamental Operations
Velero centralizes its features around three fundamental operations:
On-Demand Backup: Allows the creation of manual backups of your cluster or specific resources whenever necessary.
Scheduled Backups: Provides the ability to define recurring backup policies, automating the protection of your data at regular intervals.
Restore: The crucial feature to recover previously selected data and resources, whether restoring the entire cluster or only parts of it.
These operations are managed through Kubernetes Custom Resource Definitions (CRDs), stored in `etcd`. Velero uses controllers that monitor these custom resources and execute the necessary actions to perform backups and restores, ensuring a consistent and automated workflow.
A notable feature of Velero is its flexibility in selecting the objects to be backed up or restored. You can choose to include all objects in your cluster or apply filters by resource type (such as Deployments, Services), namespace and/or specific labels. This granularity offers precise control over the protection and recovery process.
Velero in Critical Scenarios: Disaster Recovery Simplified
Imagine the following situation: you have a Kubernetes cluster that hasn't been updated in a while and you need to perform significant upgrades, but you have limited familiarity with the installed tools. In a scenario like this, where the risk of failure during the upgrade is higher, Velero becomes a protective shield.
Before starting any modification, you can use Velero to create a complete backup of the current state of the cluster. This ensures a safe restore point. If the upgrade process encounters unexpected problems or causes system instability (which is possible given the lack of familiarity with the environment), you can restore the cluster to the previous working state, minimizing downtime and ensuring business continuity. This capability offers peace of mind and security when dealing with unfamiliar or complex environments.
Backup Workflow: A Practical Scenario
Let's understand the backup process with a simple example using the command:
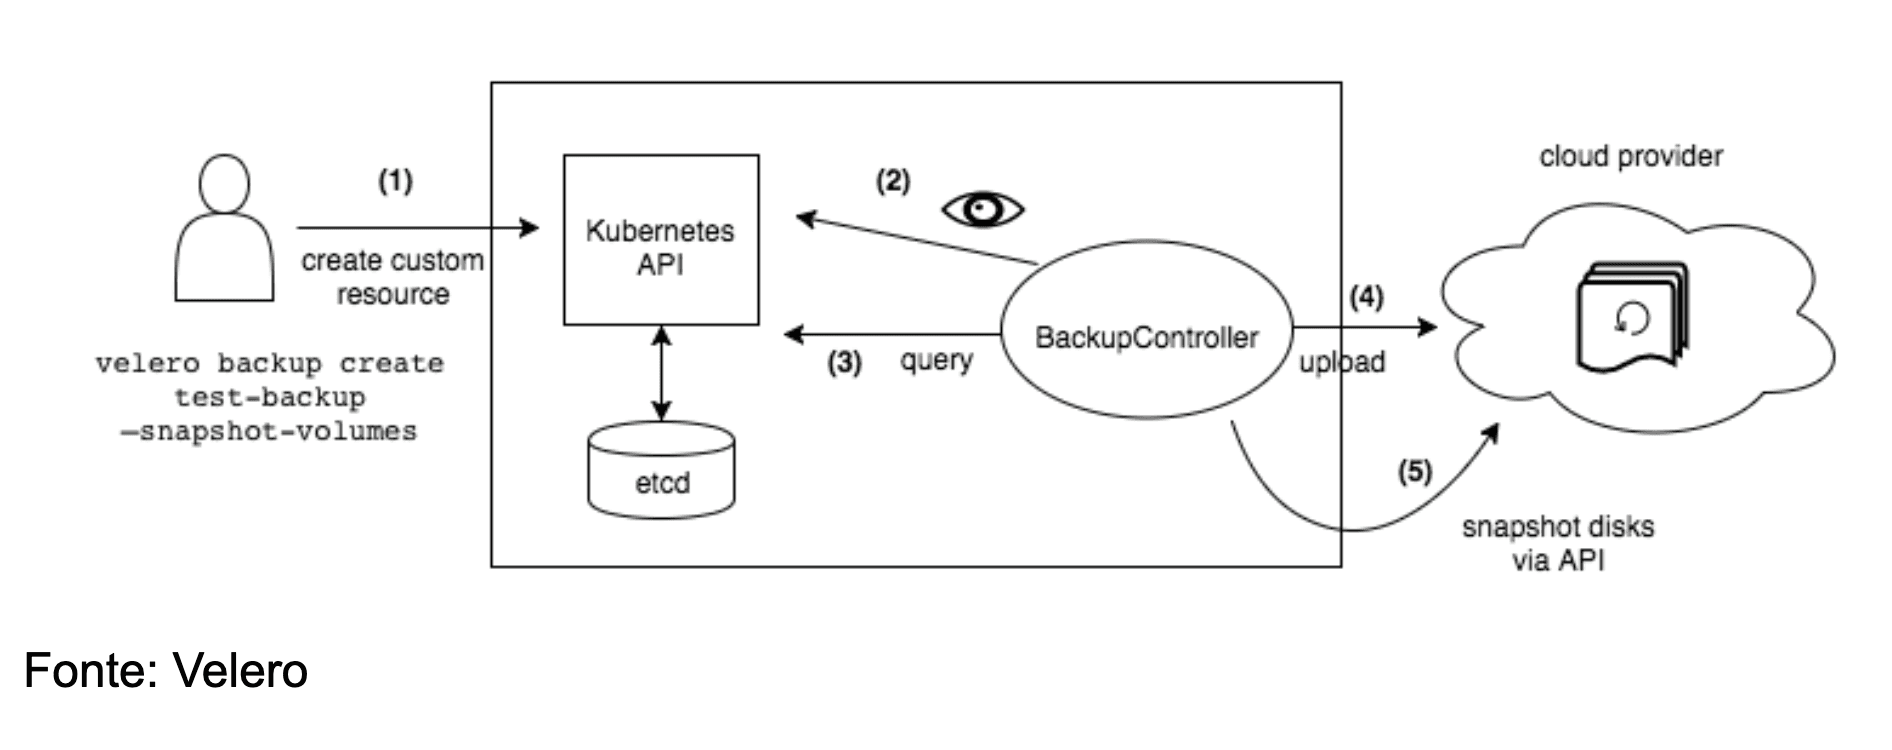
This command triggers a workflow that can be divided into four main stages (as illustrated in the image below):
Request Initiation: The cluster administrator or developer using the Velero CLI sends a request to create a `Backup` object to the Kubernetes API.
Validation by BackupController: The BackupController, a component of the Velero Server, detects the creation of the new `Backup` object and performs the request validation, verifying if all necessary parameters are present and correct.
Data Collection: Upon successful validation, the BackupController starts the data collection process. It queries the Kubernetes API server to get information about the resources that need to be selected, based on the specifications of the `Backup` object.
Upload to Object Storage: Once the resource data is collected and processed, Velero makes a call to the configured object storage service (examples will be shown in the table below). The backup files containing the metadata and, optionally, persistent volume data are uploaded to this secure location.
Important note: By default, Velero creates disk snapshots for all persistent volumes present in the cluster. However, the user has the flexibility to configure additional flags to customize the snapshots behavior, such as specifying different snapshot providers or including additional metadata.
On-Demand Backups: Details of the Process
The on-demand backup operation mainly involves two distinct processes:
Uploading Objects: Kubernetes objects (Deployments, Services definitions, etc.) are copied from `etcd` and packed into a `tarball` file. This file is then uploaded to the configured object storage in the cloud or in the local environment.
Persistent Volume Snapshots: If specified in the backup configuration, Velero makes calls to the cloud provider API to create disk snapshots of the persistent volumes associated with the selected resources.
Velero supports a wide range of cloud providers and storage solutions, with different levels of support (maintained by the Velero team or the community):
Support Maintained by Velero | |||||
Provider | Object Store | Volume Snapshotter | Plugin Provider Repo | Setup Instructions | Parameters |
Amazon Web Services (AWS) | AWS S3 | AWS EBS | Velero plugin for AWS | AWS Plugin Setup | BackupStorageLocation VolumeSnapshotLocation |
Google Cloud Platform (GCP) | Google Cloud Storage | Google Compute Engine Disks | Velero plugin for GCP | GCP Plugin Setup | BackupStorageLocation VolumeSnapshotLocation |
Microsoft Azure | Azure Blob Storage | Azure Managed Disks | Velero plugin for Microsoft Azure | Azure Plugin Setup | BackupStorageLocation VolumeSnapshotLocation |
VMware vSphere | 🚫 | vSphere Volumes | VMware vSphere | vSphere Plugin Setup | 🚫 |
Container Storage Interface (CSI) | 🚫 | CSI Volumes | Velero plugin for CSI | CSI Plugin Setup | 🚫 |
Velero Community Support | |||||
Provider | Object Store | Volume Snapshotter | Plugin Documentation | ||
AlibabaCloud | Alibaba Cloud OSS | Alibaba Cloud | AlibabaCloud | ||
DigitalOcean | DigitalOcean Object Storage | DigitalOcean Volumes Block Storage | StackPointCloud | ||
Hewlett Packard | 🚫 | HPE Storage | Hewlett Packard | ||
OpenEBS | 🚫 | OpenEBS CStor Volume | OpenEBS | ||
OpenStack | Swift | Cinder | OpenStack | ||
Portworx | 🚫 | Portworx Volume | Portworx | ||
Storj | Storj Object Storage | 🚫 | Storj | ||
It is important to consult the specific documentation for each plugin to get detailed information on configurations and parameters.
Scheduled Backups: Automating Continuous Protection
Scheduled backups allow you to define backup policies that run at regular intervals, ensuring continuous protection of your data without manual intervention. You can create a schedule at any time, and the first backup will run at the time of creation or at the next interval defined by the cron expression.
Scheduled backups follow this naming convention:
The <TIMESTAMP> is formatted as YYYYMMDDhhmmss (YEAR-MONTH-DAY-HOUR-MINUTE-SECOND). For example, if you create a backup schedule for an Nginx application named "nginx-backup", the backup name will be saved as follows in a run on April 25, 2025 at 11:49:28:
Where:
Schedule Name: `nginx-backup`
Timestamp: `20250425114928` (04/25/2025 - 11:49:28)
Restore: Recovering Your Data with Flexibility
Restoring is the crucial step to recover objects and persistent volumes from a previously created backup. Velero offers great flexibility in this process. You are not limited to restoring the entire cluster; you can choose to restore only a specific subset of objects and persistent volumes as needed.
A powerful feature of Velero is the support for re-mapping multiple namespaces. This means you can restore resources from a backup to a different namespace than the original, offering several recovery and migration options. You can even specify custom names for the restored resources.
A Practical Demonstration with Velero
In this section, we will dive into a practical demonstration of Velero, ensuring the security and resilience of your Kubernetes applications. We will see how to install and use it in a simple but powerful test scenario. For installation, we will follow the documentation on this link.
To start, let's install Velero in our Linux environment. The process is straightforward, following the official documentation and using version 1.16. First, we download the binary with the following command:
With the file downloaded, we need to extract the tarball content to access the Velero executable. We use the command:
Access the compressed file and run:
So that the system recognizes the velero command globally, we move the extracted binary to a directory present in our $PATH, such as /usr/local/bin for most Linux users:
To confirm that the installation was successful, just run the command velero version. If everything is correct, you will see information about the installed version.

Now that the Velero CLI is installed, let's set up a more complete test environment, exploring its full potential with PersistentVolumes. We will use an example provided in Velero's own documentation, available at this link.
For this test, let's clone the official Velero repository, which contains several useful examples:
We access the cloned directory to find the example files:
To simulate a backup storage environment, we will use 'minio', an open source project that implements an object storage server compatible with AWS S3 API. Installing Velero with Minio in this environment was made easier by a contributing project, which can be found at this link:
The process involves three steps:
1. Creating Credentials (credentials-velero file): In the Velero folder, we create a file called credentials-velero with the following Minio access information:
2. Next, we apply the Minio configuration to our Kubernetes cluster:
3. Finally, we install the Velero server in our cluster, configured to use Minio as the storage backend:
Environment ready:

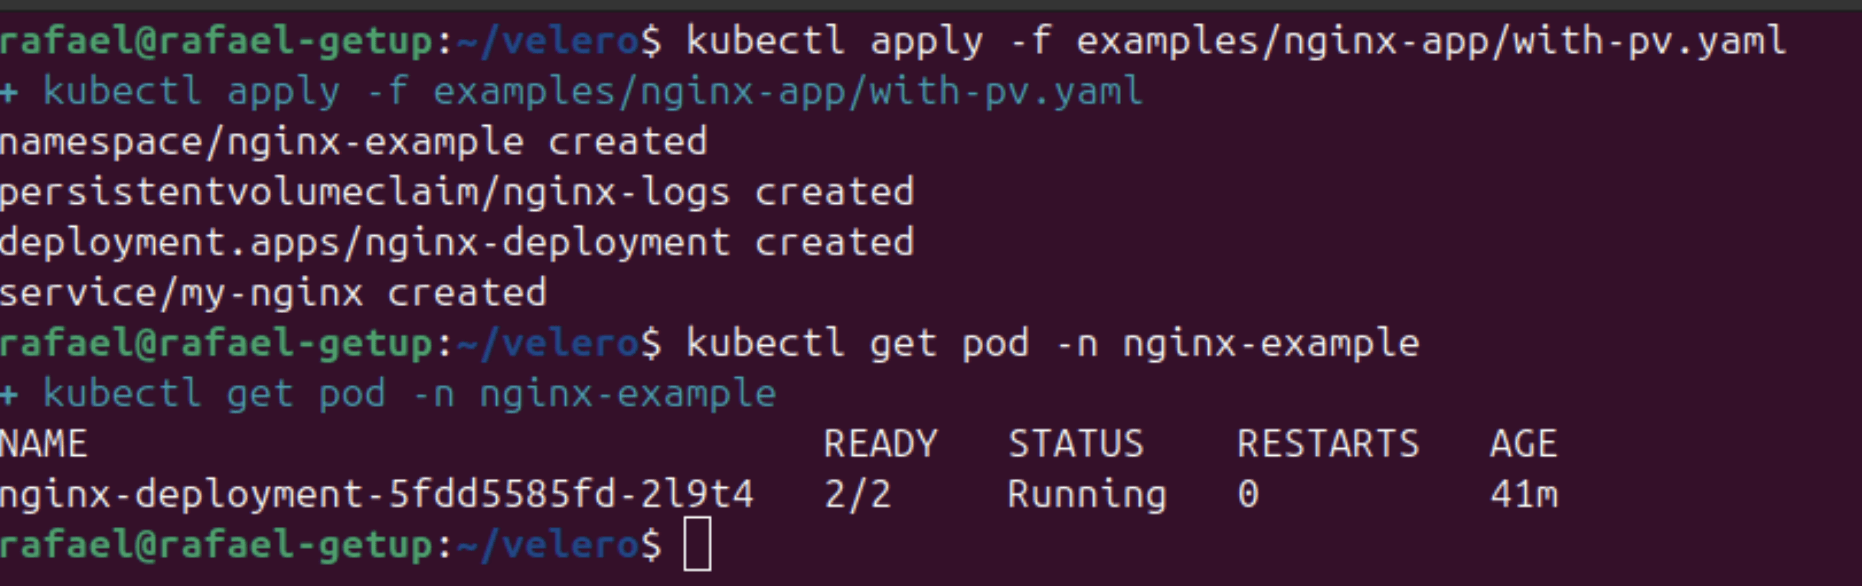
Our test environment is ready! Now let's examine the examples/nginx-app/with-pv.yaml file. This file defines a complete Nginx application, including:
This is where we are going to test our tool. We can see that it will create a namespace called nginx-example with all the environment of its structure: a PersistentVolume, Deployments, and a Service, simulating a complete application. We run the following command:
The output of this command confirms the creation of resources in the namespace nginx-example.
Now, with our application running, we will use Velero to create a full backup of this environment, including the PersistentVolume. The command for this is:
Which basically says:
It will create a new backup named nginx-backup.
It will include all Kubernetes resources present in the namespace nginx-example in this backup.
Upon locating PersistentVolumes provisioned by a CSI driver inside the namespace nginx-example, Velero will attempt to create snapshots of those volumes.
Velero will wait a maximum of 20 minutes for each CSI snapshot operation to complete. If a snapshot operation does not finish within 20 minutes, Velero will treat it as a timeout.
After the successful completion of the backup, we can obtain details about it using the command velero backup describe nginx-backup-project. The output provides us with valuable information, such as the status (Completed), the included namespaces and resources, the backup storage location (default in our case, configured for Minio), and the details of the operation.
As we saw earlier, the backup of the nginx-example namespace was successfully completed, protecting all 11 items of our application, including the PersistentVolume.
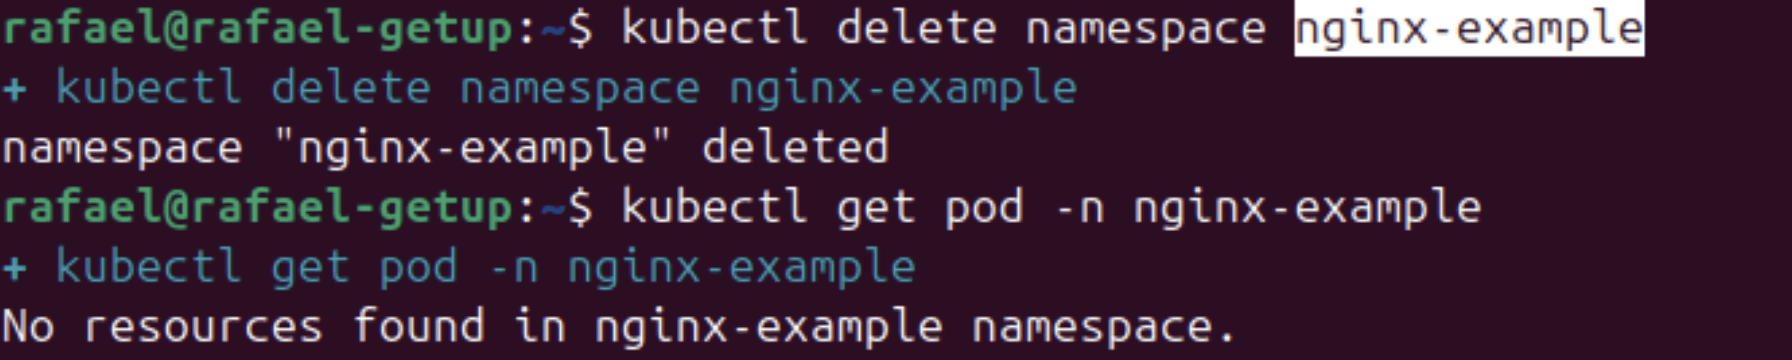
To demonstrate Velero's restore capability, we will simulate a critical failure by deleting the entire namespace of our application:
This command will remove all resources of the Nginx application, including the Deployment, the Service, and the PersistentVolumeClaim.
With our environment simulated as lost, we can easily restore it using Velero with the following command:
This command instructs Velero to create a new restore from the backup nginx-backup-project.

After the restore is completed, we can verify that the nginx-example namespace has been recreated and all resources of our application, including the Deployment, the Service, and the Pod with the PersistentVolume, have been restored to the state they were in at the time of the backup.
With this simple example, we demonstrated Velero's power in protecting your Kubernetes applications, allowing rapid and reliable recovery in disaster or failure scenarios. The ability to backup and restore entire namespaces, including persistent data, makes Velero an indispensable tool for any production Kubernetes environment.
Conclusion
In short, Velero emerges as an exceptionally robust and adaptable backup and restore solution for the Kubernetes ecosystem. Its capacity to protect everything from individual resources to entire clusters, coupled with the flexibility of scheduling and granular restore, makes it an indispensable tool for ensuring the resilience and security of containerized applications.
The well-defined architecture, with Velero Server orchestrating operations and Velero CLI facilitating interaction, simplifies backup and restore management. Compatibility with various cloud providers and storage solutions, driven by both maintainers and the active Open Source community, further expands its applicability in different scenarios.
For cluster administrators, Velero represents much more than a simple backup tool. It becomes an essential guardian, offering the peace of mind of being able to recover environments in critical situations, facilitate complex migrations, and replicate environments for development and testing with confidence. The ability to re-map namespaces and protect storage locations during restore demonstrates the attention to detail and concern for providing precise control over the cluster's data lifecycle.
Therefore, for those looking for an effective and reliable data protection strategy in their Kubernetes environments, Velero is not just a good option – it is a primary and extremely valuable tool, empowering cluster caretakers to maintain the integrity, availability, and continuity of their applications with security and efficiency.
Newsletter Getup.
Atualizações sobre Kubernetes e Software Supply Chain Security todos os meses.
Operating Kubernetes in production for more than 13 years. With Quor, this experience extends to software supply chain security as well.
GET UP
© Getup · 2026